Now, I always get excited when she and I get to spend some alone time together, especially when we are working on a project, or searching for adventure. She is such a sweet, happy soul, and I can't help but laugh spending with her.


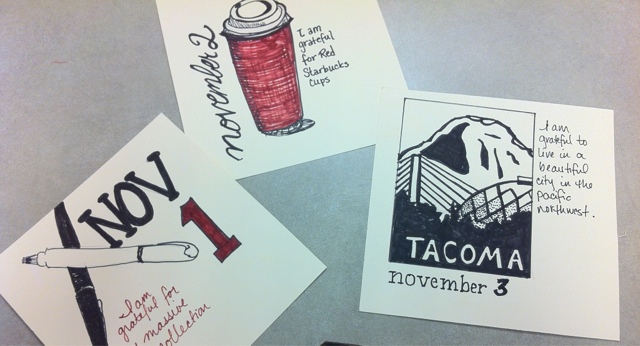
 Another few days of gratitude to share for November. One, my oldest daughter's gorgeous eyes. They are just amazing. Next, our cozy little home. I adore how my house feels, and it is always a treat coming home to the warm welcome of my family. Then, of course, I am so grateful that I feel loved. It is such a blessing to have friends and family that support me and encourage me. Finally, I am grateful for Facebook, because I am able to connect with people that are true friends daily.


 2.Get your decoupage material and sponge brush. I use Collage Pauge, mostly because my craft
store did a demo of it one day and let my kid glue marbles to their table for a
half hour or so while she was supposed to be making magnets. She wasn’t
intentionally gluing them, but when you are six, more glue is better, and
everything gets glued together. When we were done, she wanted to make more, and
I had to purchase the products they used, because when you are six, you do what
the teacher says. I guess the lady on the front label is famous, I don’t know,
but she does make a good decoupage medium.
2.Get your decoupage material and sponge brush. I use Collage Pauge, mostly because my craft
store did a demo of it one day and let my kid glue marbles to their table for a
half hour or so while she was supposed to be making magnets. She wasn’t
intentionally gluing them, but when you are six, more glue is better, and
everything gets glued together. When we were done, she wanted to make more, and
I had to purchase the products they used, because when you are six, you do what
the teacher says. I guess the lady on the front label is famous, I don’t know,
but she does make a good decoupage medium.
 4. For the wings, I used shrink plastic; remember shrinky dinks? This
is the same thing, but not preprinted, so it can be whatever you want it to
be. I wanted it to be wings, so I
sketched out a wing with a Graphite Pencil. If you
prefer, you can find a wing image and trace it.
Whatever works best for you. I secured
the shrink plastic with painter’s tape because when I do not, it slides all
around, and I mess up my tracing. I used Black Artist Pens
to trace the sketch, and build up the lines for more dimension. Be careful
tracing, as the artist pens and the shrink plastic work like a whiteboard, and
if you drag your hand across tracing you have already done, it will rub
off. I learned this the hard way, so don’t
be like me on this one, or you’ll end up with missing lines and a black smeared
hand. This is useful, however if you
mess up, just rub it off and try again. Flip the image on the second sheet so
your wings face out opposite and complete the second wing.
4. For the wings, I used shrink plastic; remember shrinky dinks? This
is the same thing, but not preprinted, so it can be whatever you want it to
be. I wanted it to be wings, so I
sketched out a wing with a Graphite Pencil. If you
prefer, you can find a wing image and trace it.
Whatever works best for you. I secured
the shrink plastic with painter’s tape because when I do not, it slides all
around, and I mess up my tracing. I used Black Artist Pens
to trace the sketch, and build up the lines for more dimension. Be careful
tracing, as the artist pens and the shrink plastic work like a whiteboard, and
if you drag your hand across tracing you have already done, it will rub
off. I learned this the hard way, so don’t
be like me on this one, or you’ll end up with missing lines and a black smeared
hand. This is useful, however if you
mess up, just rub it off and try again. Flip the image on the second sheet so
your wings face out opposite and complete the second wing.

 6. Take your ribbon and distress it by running the SepiaPen along the edge, and by rubbing the Silver Metallic Gelato on
the top of the ribbon. I used a plain
white grosgrain ribbon. Once I was happy with my distressing, I laid out another
garbage bag and set up some more collage pauge and ran the ribbon through the
medium, and then laid the ribbon across my heart artfully. Then, I placed the heart on a new garbage
bag, and set it so the ribbon had a bit of a wave to it and let it dry. The medium gives it a bit of stiffness, which
works well with the end project.
6. Take your ribbon and distress it by running the SepiaPen along the edge, and by rubbing the Silver Metallic Gelato on
the top of the ribbon. I used a plain
white grosgrain ribbon. Once I was happy with my distressing, I laid out another
garbage bag and set up some more collage pauge and ran the ribbon through the
medium, and then laid the ribbon across my heart artfully. Then, I placed the heart on a new garbage
bag, and set it so the ribbon had a bit of a wave to it and let it dry. The medium gives it a bit of stiffness, which
works well with the end project.